In this Photoshop Tutorial you will learn how to create a photo effect for more visual impact, this technique used in different types of promotional materials.
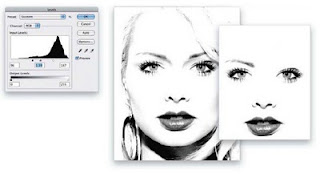
STEP ONE: Open an image of a face. Choose Filter>Sharpen> Smart Sharpen. Enter 200% for Amount and click OK. Drag the Background layer onto the Create a New Layer icon at the bottom of the Layers panel to duplicate the layer (Background copy). Press Command-Shift-U (PC: Ctrl-Shift-U) to desaturate the layer (create a grayscale image). [NAPP members may download the image used in this tutorial at www.photoshopuser.com/members/aprmayl 1-downloads.htmI.
 |
| Step 1 |
STEP TWO: Press Command- L (PC: Ctrl-L) to bring up the Levels dialog. Click on the black Input Levels slider on the left and drag it toward the right, or enter 96 in the Shadow Input Level field. Click on the white slider on the right and move it toward the left, or enter 187 in the Highlight Input Level field. Finally, click on the gray slider in the center of the dialog and move it slightly toward the left, or enter
1.39 in the Midtone Input Level field. Click OK. Press D, then X to set the Foreground color to white. Choose the Brush tool (B) from the Toolbox. Using a soft-edged brush, paint away everything except the lips, eyes, right eyebrow, and nose.
(Note: We'll add back the left eyebrow in the next step.)
 |
| Step 2 |
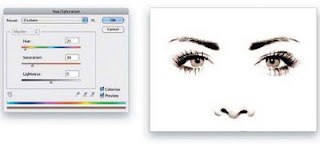
STEP THREE: Choose the Lasso tool (L) from the Toolbox and make a loose selection around the right eyebrow. Bring up the Levels dialog, move the black Input Levels slider toward the right to 147, and click
OK. Press Command-Option-T (PC: Ctrl-Alt-T) to bring up the Free Transform bounding box. Right-click in the center of the bounding box and choose Flip Horizontal. Reposition the "flipped" eyebrow over the left eye and press Return (PC: Enter) to apply the transformation. Press Command-D (PC: Ctrl-D) to deselect.
 | |
| Step 3 |
STEP FOUR: Press Command-U (PC: Ctrl-U) to bring up the Hue/Saturation dialog. Check the Colorize checkbox, enter 21 for Hue, 18 for Saturation, and click OK to apply a slight brownish tint to the grayscale image.
 |
| Step 4 |
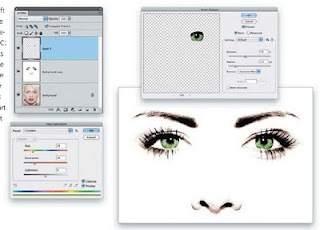
STEP FIVE: Using the selection tool of your choice (we used the Lasso tool), make a selection around the left iris and pupil. Bring up the Levels dialog, enter 60in the Shadow Input Level field, 241 in the Highlight Input Level field, and click OK. Make a selection of the right iris and pupil and bring up the Levels dialog. Enter 79 in the Shadow Input Level field, 236 in the Highlight Input Level field, and click OK.
 |
| Step5 |
STEP SIX: Hold down the Shift key, select the left eye (only the iris and pupil) so both eyes are selected, and press Command-J (PC: Ctrl-J) to put the selection on its own layer (Layer 1). Bring up the Hue/Saturation dialog, enable the Colorize checkbox, enter 75 for Hue, 25 for Saturation, and click OK. Choose Filter>Sharpen>Smart Sharpen. Enter 75% for Amount and click OK.
 |
| Step 6 |
STEP SEVEN: Click on the Eye icon next to the Background copy layer in the Layers panel to hide it from view and reveal the Background layer underneath it. Click on the Background layer in the Layers panel to make it active and make a selection of the lips. Press Command-J (PC: Ctrl-J) to place the selection on its own layer (Layer 2). Move Layer 2 to the top of the layer stack in the Layers panel and click where the
Eye icon of the Background copy layer used to be to make it visible again. Bring up the Levels dialog, enter 89 in the Shadow Input Level field, 212 in the Highlight Input Level field, and click OK.
 |
| Step7 |
STEP EIGHT: Duplicate Layer 2 by dragging it onto the Create a New Layer icon (Layer 2 copy). Choose Filter>Artistic>Dry Brush. Enter 10 for Brush Size, 0 for Brush Detail, 1 for Texture, and click OK. Change the layer blend mode to Overlay in the Layers panel.
 |
| Step8 |
STEP NINE: Hide the Background copy layer and make the Background layer active in the Layers panel. Make a selection of the teeth and press Command-J (PC: Ctrl-J) to place the selection on its own layer (Layer 3). Move Layer 3 to the top of the layer stack and make the Background copy layer visible again. Press Command-Shift-U (PC: Ctrl-Shift-U) to desaturate the layer. Bring up the Levels dialog, enter 32 in the Shadow Input Level field, 213 in the Highlight Input Level field, and click OK to complete the effect.
 |
| Step9 |


0 comments:
Post a Comment