Layer masks are one of the most critical features for compositing images in Photoshop. But don't forget that you can also apply things such as filters to a layer mask to achieve amazing effects without ever altering the original image. In this tutorial, we'll create a mask from an image and then apply one of the Pixilate filters. This is a simple photoshop tutorial but yet effective.
 |
| Final Result |
STEP ONE: Open an image to which you would like to apply the effect. it would be a good idea to play with this effect on different types of images to see what works best. Here, we have an image
of a model from iStockphoto.com.
 |
| Step 1 |
STEP Two: Next, open the abstract image that will be used to create the mask. This image has some pretty cool angles in the graphic that will work with the angle of the subject from Step One.
 |
| Step 2 and 4 |
STEP THREE: Select the Move tool (V) and drag-and-drop the abstract shape file to the image containing the subject. it will appear on its own layer (Layer 1). The cool thing about an abstract image is that it can be rotated, distorted, or warped to cater to the subject. To be able to do that, however, we need to be able see the image below the abstract shape.
STEP FOUR: To help visually place the abstract shape, drop the Opacity of the layer to 50% in the Layers panel. This will allow us to see the background image below the abstract shape.
STEP FIVE: Press Command-T (PC: Ctrl-T) and then flip, distort, or rotate the shape to best fit the position of the subject. In this example, we're merely rotating the image so that the blue area is over the main subject. To rotate the layer, hover the cursor outside the bounding box until the cursor changes into a double-headed bent arrow, and then click-and-drag (hold the Shift key to drag in 15° increments). Click<-and-drag inside the bounding box to position the blue area. Press Return (PC: Enter) to commit the transformation.
 |
| Step 5 |
STEP SIX: Don't worry if the image background doesn't cover the entire image area. In this case, since the background is black it's easy to just fill the empty area with black. Raise the Opacity of the blue shape layer back to 100%, and then Command-click (PC: Ctrl-click) its layer thumbnail to select it. Go to Select>inverse to select the areas outside of the shape. Press D to set your Foreground color to black, and then press Option-Delete (PC: Alt-Backspace) to fill with black. Press Command-D (PC: Ctrl-D) to deselect. To soften the left edge of the blue shape, switch to the Gradient tool (G), Right-click in the document, select the Foreground to Transparent gradient in the Gradient Picker, select the Linear Gradient option in the Options Bar, and then click-and-drag from the left edge of the document about halfway into the blue shape.
 |
| Step 6 |
STEP SEVEN: Once the shape image is in place and the background area is filled, hide the layer of the model (Layer O) by clicking on the Eye icon next to it in the Layers panel. Then, go to the Channels panel (Window>Channels). We need to determine which color channel shows most of the abstract shape. In this case, it's the Blue channel. Hold down the Command (PC: Ctrl) key and click on the Blue channel thumbnail to load the white and gray area of the channel as an active selection.
 |
| Step 7 |
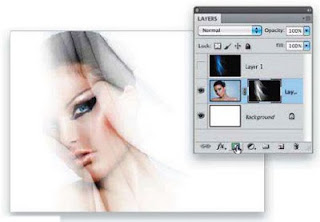
STEP EIGHT: Back in the Layers panel, dick the Eye icon for the blue shape layer (Layer 1) to hide it. Turn the visibility back on for the layer containing the model (Layer 0), and then click on the layer to make it active. Click the Add Layer Mask icon (circle in a square) at the bottom of the Layers panel, or go to layer>Layer Mask>Reveal Selection. This will make the subject visible only through the abstract shape, which is now a layer mask.
 |
| Step 8 |
STEP NINE: Now click on the layer mask thumbnail to make it active, as indicated by the thin black
lines around the thumbnail. Then, go to Filter>Pixelate>Mosaic. Set the Cell Size to 45 square and click
OK. (Note: Vary the setting based on the image size and resolution.)
 |
| Step 9 |


0 comments:
Post a Comment