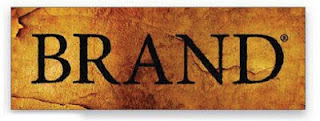
In this Photoshop tutorial we'll explore how to apply a displacement map to a smart object, darken letters with the Bum tool and the Multiply blend mode, and create a relief effect with a Bevel and Emboss layer style. Follow along to learn how to make branded type in Photoshop.
STEP ONE: Here we have some black text set against a textured rock wall (the text color doesn't matter). For the sake of convenience, we entered the word "BRAND" on one layer and the registered trademark symbol on another—which is just fine. One of the great things about this technique is that you can apply it to multiple layers at once. Open (File>Open) the textured image and select the Type tool (T). Choose an applicable font and size in the Options Bar and enter some text. Press the Commit icon (checkmark) when finished. Make sure the text layer is active in the Layers panel (Command-click< [PC: Ctrl-click] each text layer in the Layers panel if there are more than one to select all) and select the Rectangular Marquee tool (M). Right-click in the document window and choose Convert to Smart Object. This makes the text compatible with nondestructive smart filters.
 |
| Step 1 |
STEP TWO: Now we're going to save the textured background as a displacement map, which is an image that distorts another image according to its luminance levels. In the Layers panel, select the Background layer (textured image), Right-click in the document window, and choose Duplicate Layer. In the resulting dialog, change the Document setting to New and give the image a memorable Name. Click OK to create the new image in a separate Photoshop document. In Photoshop, a displacement map has to be a flat PSD file, and unless you want different results for the horizontal and vertical distortions, it should be grayscale. Choose image>Mode>Grayscale. Click Discard in the corresponding dialog to convert the image to a single channel of luminance data. Save (File>Save As) the image as a PSD.
 |
| Step 2 |
STEP FOUR: In my experience, the best way to bum the text into the bad<ground is with the Bum tool. Unfortunately, the Burn tool works with neither editable text nor smart objects. Instead, we'll need to convert the text into a selection. Hold down the Command (PC: Ctrl) key and click on the text layer Smart Object thumbnail in the Layers panel to load it as a selection. Click its Eye icon to hide its visibility and click the Background layer (textured image) to make it active. To jump the selection to a new layer, press Option-Command-J (PC: Alt-Ctrl-J), name the new layer "Burned Type," and click< OK.
STEP FIVE: Select to the Bum tool (nested with the Dodge tool [O]) and choose a large, blurry brush. Paint where the text once was to make it somewhat visible again. (77p: Paint over the text once or twice; anything more usually makes it too dark.) When finished, select Multiply in the top-left comer of the Layers panel to bum the text into the background.
 |
| Step 5 |
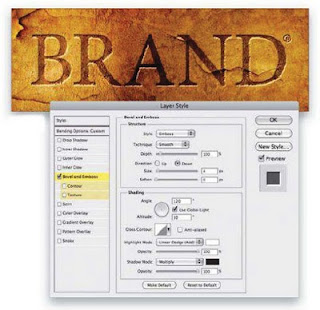
STEP SIX: Now we're going to add beveled edges, so the branded letters appear to be stamped into the surface of the image. Click the Add a Layer Style icon (fx) at the bottom of the Layers panel and choose Bevel and Emboss. Choose Emboss for Style, Down for Direction, and 4px for Size. Choose Linear Dodge (Add) for Highlight Mode and increase its Opacity to 100%. Click the Shadow Mode color swatch, choose a dark brown color (R:42, G:22, B118), click OK, and increase its Opacity to 100%. Click< OK to achieve the final result.
 |
| Step 6 |
STEP SEVEN. The wonderful thing about this straightforward approach is how flexible it is. You can rerun these same steps with any badcground image to create as many variations as you like. In the case of the images shown here, we employed the same text but with different displacement maps and different effects. And because the base text is expressed as a smart object, you can switch out the behavior of the Displace smart filter in the Layers panel when the text layer is active and visible, double-click the word "Displace" to load a different displacement map—without having to start from scratch. If your letters appear too dark or light, you can also adjust the Burned Type layer using a Levels command (Image>Adjustments>Levels). You can adjust the Bevel and Emboss layer style effect to taste as well (double-click the words “Bevel and Emboss" in the Layers panel). One of the things I love about Photoshop is the way it lets you turn type and other synthetic objects into fully integrated components of your photographic composition. If you agree, keep an eye out for future installments of this column. We'll have more live-type techniques coming your way.


0 comments:
Post a Comment