In this in this tutorial you may learn a simple Photoshop Trick on how to convert you simple photo into an antique-drawing on a piece of aged parcment paper.
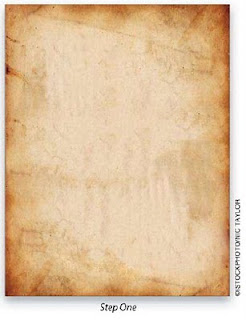
1. Go to File>Open and locate the texture file that your would like to use for the background. This can be almost any texture, so feel free to try different types of paper textures. In this case, we have a nice aged parchment texture, which we'll enhance by converting a photo into a drawing and making it look aged on the paper texture.
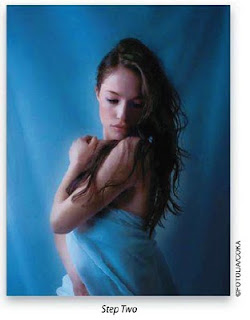
2. Open the photo that you want to convert into the illustrated effect. Here we have a simple stock image of a young model. The positioning and lighting of the subject in this image will lend itself well to this effect. The cool thing about this effect is that with just a little tweaking of the following settings, you can do this to almost any photo.
3. With the file open, switch to the move tool(V), hold down the Shift key, and drag-and-drop the model onto the paper texture background file(the Shift key will place it int the center). The model will appear on a new layer(Layer 1). If necessary, press Command-T (PC: Ctrl-t) to put the layer in Free Transform mode and scale it to best fit the composition. Hold the Shift key as you click-and-drag the control handles of the Free Transform bounding box to maintain proportion. Press Return (PC: Enter) when finished to commit the tranformation.
4. Go to Image>Adjustments>Desaturate,
as we don't need the color information for this effect. Next, make a duplicate
of this layer by pressing Command-J (PC: Ctrl-J). Then, turn off the visibility
of this duplicate layer (Layer 1 copy) by clicking the Eye icon to the left of
it in the Layers panel. Click on the original layer (Layer 1) to make it
active.
5. To make the image look less
like a photo and more like a shaded sketch,
we need to lessen the amount of detail in the image by blurring it. To blur the
image but keep the edge detail, we need to use the Surface Blur filter. Go to
Filter>Blur>surface Blur. Set the radius to 5 pixels and the Threshold to
5 levels. These settings will vary on different images and may require some
experimenting to get the look you want. Once don, click Ok. Go ahead and turn
off the visibility of this layer (Layer 1) for the moment.
6. We're going to use one of the
new blend mode trick comes into play. We're going to use one of the new blend
modes that only available in Photoshop
CS5. Click on the duplicate layer (Layer 1 copy) to make it active, and
then click where its Eye icon used to be making it visible again. Make another
duplicate from this layer (Layer 1 copy 2) by pressing Command-J (PC: Ctrl-J). Go
to the layer blend mode drop-down menu at the top left of the Layer panel and
select Dive blend mode. The image will appear to go completely white.
Note: If you don't have CS5, you can try
an older method by going to Filter>Stylize>Find Edges. This will apply a
sketch effect but you won't have the flexibility of modifying the effect as you
do with the blend mode method
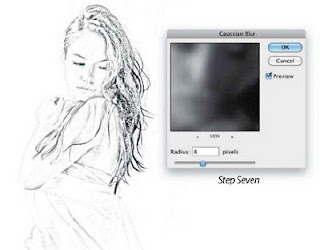
7. Go to the Filter menu again
and choose Blur>Gaussian Blur. The amount of the Blur depends on the image
that you're working with. As you move the radius slider to the right and
increase the blur, you'll see the sketch effect start to emerge. Try pushing
the radius to the max and then back it off until you get the look you want for
the sketch effect. For this image, we set the Radius to 8 pixels. Click OK.
8: Merge this layer (Layer 1 copy
2) with the layer just below (Layer 1 copy) by pressing Command-E (PC: Ctrl-E).
Change the layer blend mode of the resulting merged layer (Layer 1 copy) to
Color Burn in the Layers panel. Create a duplicate of this layer and change the
layer blend mode of the duplicate layer (Layer 1 copy 2) to Linear Bum. This
will build the effect up by stacking and blending the layers with the paper
texture we started with.
9: While these blend modes work
really well for this image, it may be necessary to try other blend modes if the
image isn't looking exactly the way you want. This can be done quickly by
holding down the Shift key while pressing the + (plus) key repeatedly to cycle down
through the blend mode list.
10: Reactivate the original image
layer we applied the Surface Blur to in Step Five and make it visible. Change
its mode to Color burn, as well. This will provide the shading to add more
contrast to the overall sketch effect. If the result seems a bit too intense,
however, you can lessen the effect through the use of a layer mask. Hold down
the Option (PC: Alt) key while clicking the Add Layer Mask icon (circle in a
square) at the bottom of the layers panel. This will hide the layer by creating
a layer mask filled with black.
11: Select the Brush tool (B),
did: the brush thumbnail in the Options Bar, and select a soft-edged brush in
the Brush Preset Picker. If you're using
a pressure-sensitive tablet, you can go into the Brush panel (Windows>Brush)
and activate the Transfer option in the list on the left. Then, set the Control
drop-down menus for both Opacity litter and Flow Jitter to Pen Pressure. If
you're not using a tablet, then you can simply drop the Opacity of the brush in
the Options Bar to a much lower setting.
12: Finally, set the Foreground
color to white by pressing the D key. Then, paint in the areas of the layer
where you want to bring in shading and detail to the illustrated image. Make
sure you're painting on the layer mask and not the layer itself (there should
be thin black lines around the layer mask thumbnail in the Layers panel; if
not, click on the layer mask thumbnail to make it active). If the effect is still
too intense, you can always drop the Opacity of the layer itself in the Layers
panel to lessen the effect.
Here you can see the final
result. When combined with the image of the paper texture that we started with,
the sketch we created from the photo
now looks like an aged drawing. Here's another example of this same technique
using a different image. Once you have the basic technique down, you can try it
on other images with other textures, and as I mentioned earlier, with just a
little tweaking of the settings you can achieve this effect with almost any photo.


0 comments:
Post a Comment