This is one of those effects that once you figure out how to create it, you end up using it in many different ways because it's so easy to change the images and text. By using smart objects in a very intelligent way, you can achieve really cool, easily updatable designs.
 |
| Final Result |
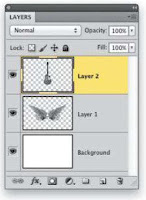
STEP ONE: Let's start with a stock image of a pair of wings that will be the base element of our design. Using the Magic Wand tool (nested under the Quick Selection tool [W] in the Toolbox), click on the white background to select it. You might need to hold down the Shift key and then click to add any areas that got missed (by raising the Tolerance setting in the Options Bar. as well). Once the selection is made, go to Select>lnverse to flip the selection around to the subject.
STEP TWO: Next, create a new document measuring 1O.5x7' at 100 ppi. Then, use the Move tool (V) to drag-and-drop the wing image into this new layout. Once there. Press Command-T (PC: Ctrl-T) to invoke Free Transform and scale the object disproportionately by squashing it horizontally. When done, press Enter. Press Shift-Command-U (PC: Shift-Ctrl-U) to remove the color in the image, then pres Command-I (PC: Ctrl-I) to invert the wings.
STEP THREE: Open the next image, which is a classic guitar. Some stock images like this come with a clipping path around the object, if not, don’t worry just use the same technique we just used to extract the wings. Again, press Shift-Command-U (PC: Shift-Ctrl-U) to remove the color and then drag it over to the working layout.
STEP FOUR: Once the guitar is in the layout, use Free Transform to scale (hold the Shift key to maintain proportions) and position it in the center of the graphic as you see here. Press Enter when done.
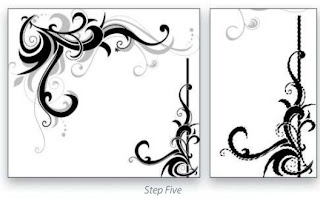
STEP FIVE: We have one more graphic element to add to the design. Open the swirly graphic image and use the Lasso tool (L) in the Toolbox to draw a loose selection around the smaller black swirly graphic at the bottom right. Then, switch to the Magic Wand tool and uncheck Contiguous in the Options Bar. Hold down the Option (PC: Alt) key and click on the white background inside the selected area. This will eliminate the remaining white background from the selection, leaving only the black graphic selected. Drag this to the working layout.
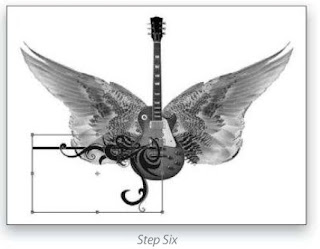
STEP SIX: Press Command-T (PC: Ctrl-T) to invoke Free Transform once again, and click-and-drag outside of the bounding box to rotate the object. Click-and-drag inside the box to position it at the lower-left side of the graphic, as shown here, and scale its size down a little. When done, press Enter.
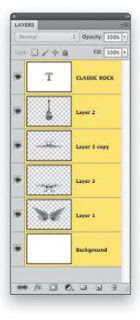
STEP SEVEN: Press Command-J (PC: Ctrl-J) to make a duplicate of the swirly layer, and go to Edit>Transform>Flip Horizontal. Use the Move tool to drag this layer to the right until it mirrors the other side (hold the Shift key so it stays in line with the original swirly graphic). Once in place, press Command-E (PC: Ctrl-E) to merge the two swirly layers together.
STEP EIGHT: Make a duplicate of this layer and then go to Edit>Transform>Flip Vertical. Move this element up until you have enough space between the swirly elements to place some text. Use Free Transform to make the top swirly graphic a little smaller than the one below. Switch to the Type tool (T) and press D to set your Foreground color to black. Type the words "CLASSIC ROCK" (we used Trajan Pro at around 68 pt) and position the type as you see here. Once everything is in place, drop the layer Opacity for both swirly layers to 50% and drag them in the Layers panel below the layer containing the guitar but above the layer containing the wings.
STEP NINE: Click on the top layer in the Layers panel, hold down the Shift key and click the Background layer at the bottom to select all the layers. Convert them into a smart object by Right-clicking on any layer and choosing Convert to Smart Object.
STEP TEN: Open a background texture file in which the finished design will be made. Drag the smart object layer to the texture layer. Hold down the Shift key as you drag to make sure it's dropped in the center. (The download texture file is the same size as the design file, so it should fit perfectly.)
STEP ELEVEN: Go to Filter>Stylize>Find Edges. This will change the design into a sketch outline. Filters applied to smart objects are considered smart liners, meaning they are nondestructive, allowing you to edit the original image within the smart object (more on that later).
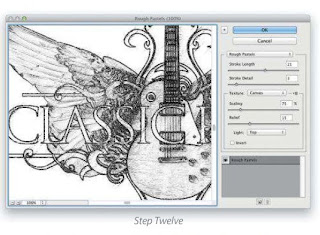
STEP TWELVE: Go under the Filter menu again to Artist>Rough Pastels. Every image will need different settings but the ones shown here is a good place to start. Just tweak the sliders until you have a nice grungy sketch effect. Click OK when done.
STEP THIRTEEN: You can see the result is pretty interesting but why stop here? Change the layer blend mode in the Layers panel to Color Burn. Make a duplicate of this smart object layer, and set this layer‘s blend mode to Soft Light. Turn off the filters on this duplicate layer by clicking on the Eye icon next to the Smart filters mask just below.
STEP FOURTEEN: Click on the Create New Adjustment Layer icon (halt-black, half-white circle) at the bottom of the Layers panel and choose Invert. This will apply an inversion to the entire image, but what we want here is to isolate it to the layer below it by using a dipping group. Do this by pressing Option-Command-G (PC: Alt-Ctrl—G).
STEP FIFTEEN: Now tor one final optional element: The background texture looks good but I think a nice gradient layer style could really add something to it. Click on the texture layer in the Layers panel to make it active, click the Add a Layer Style icon (fx at the bottom of the Layers panel, and choose Gradient Overlay. (Note: If your texture is on the Background layer, double-click it to make it a regular layer.) Use the settings shown here to get a nice high contrast vignette on the background completing the overall look.
There you have it a seemingly complex look, yet it’s composed of smart objects, which contain all the original layers including the text layer. All we have to do is double-dick the smart object thumbnail in the Layers panel to open the original layered file. Once inside that smart object, you can change whatever you want, close and save the file, and it will update the image and re—render the filters automatically. It will even update all the duplicate smart objects as long as they're still linked to the original smart object.










0 comments:
Post a Comment